Connecting to a CRM
Automatically sync unlocked contacts to Salesforce, HubSpot, Close, or HighLevel.
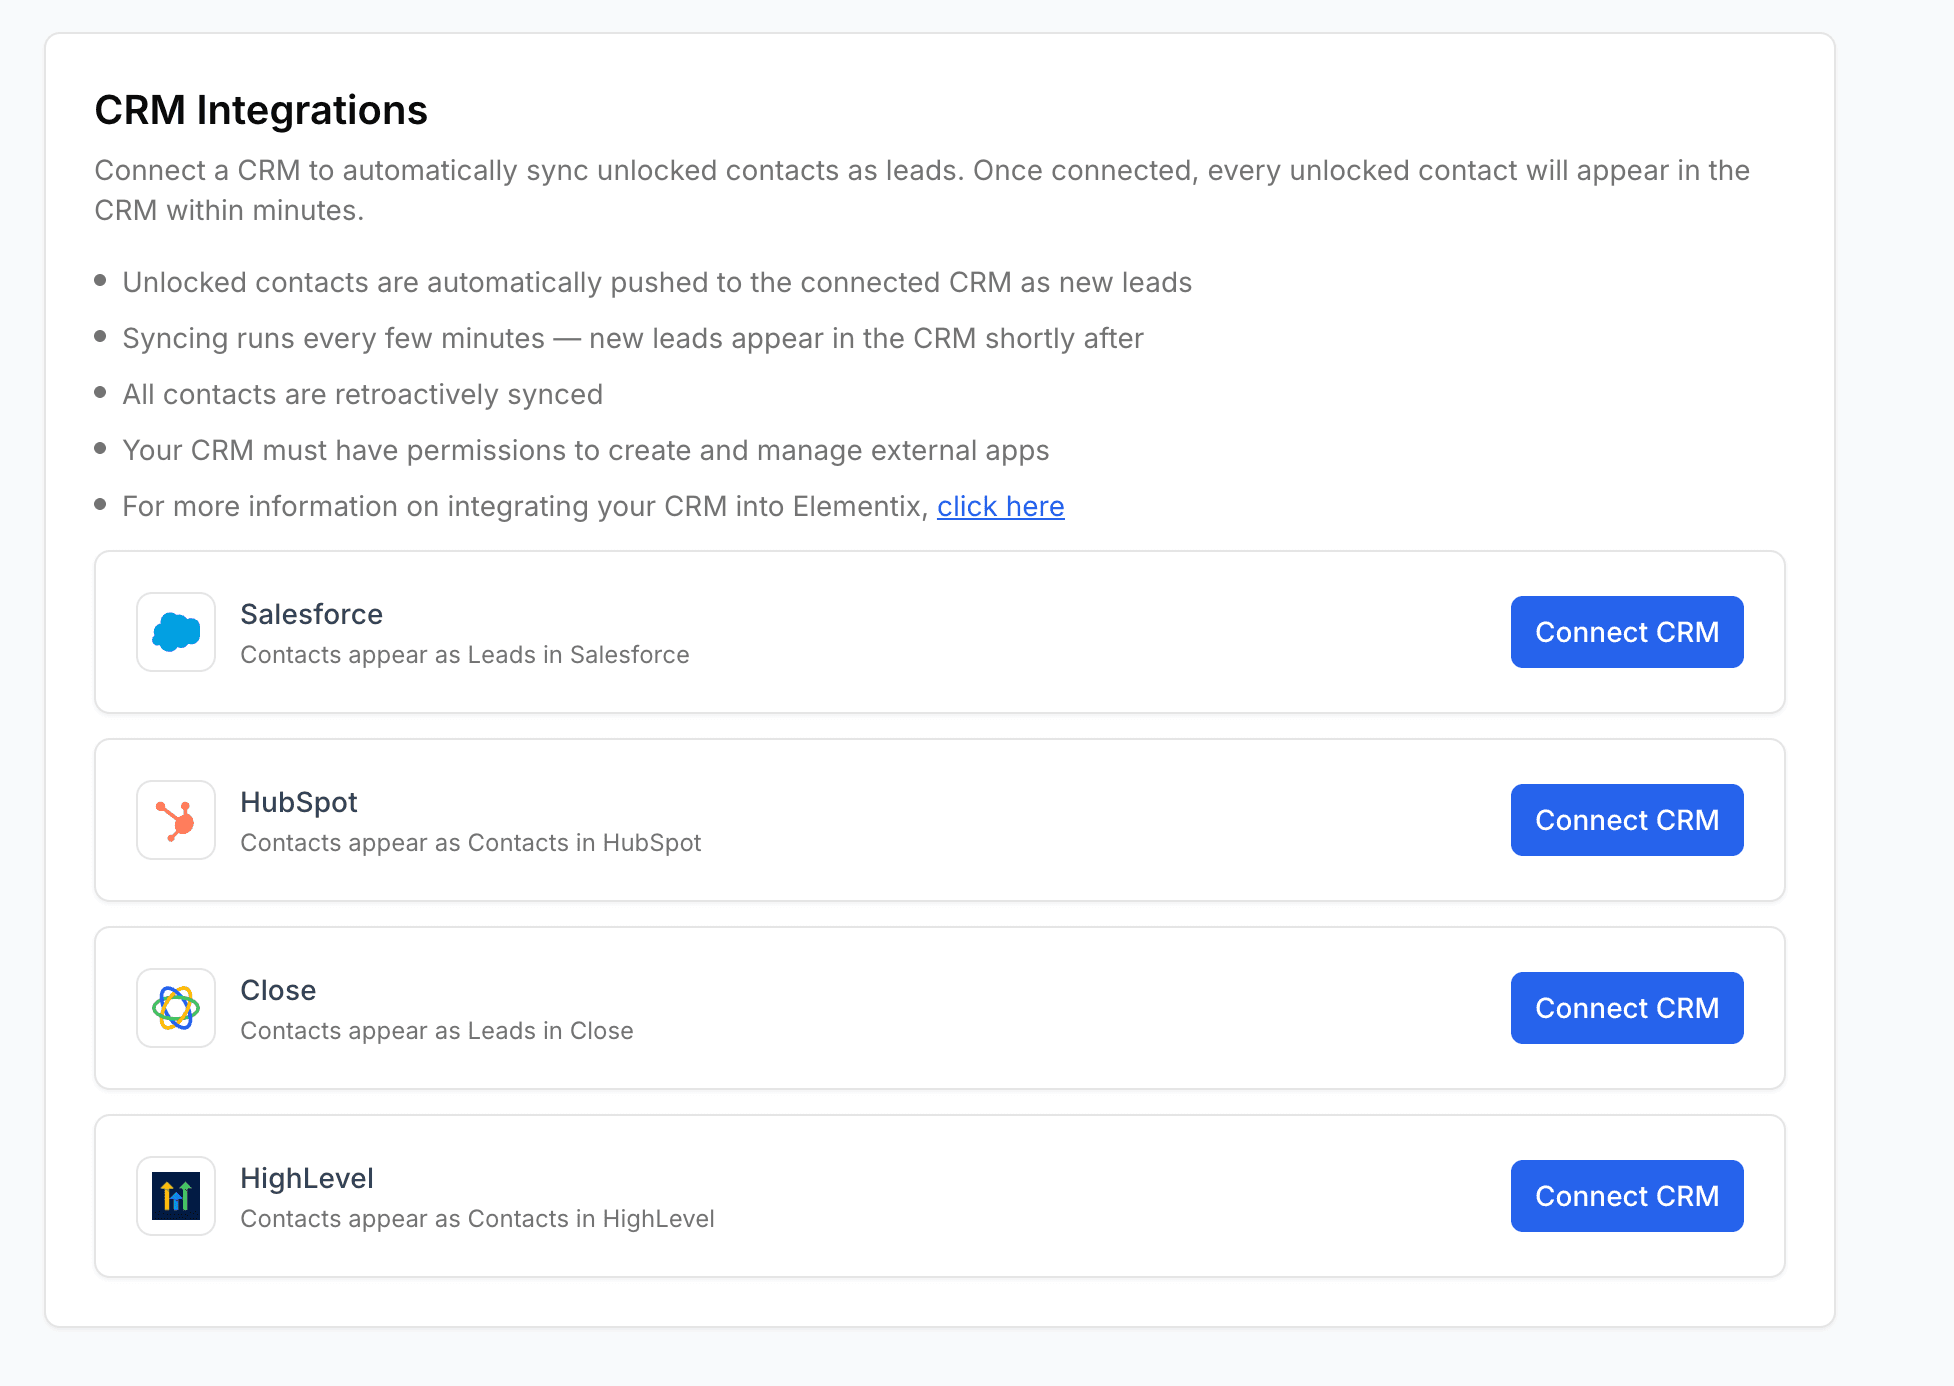
Connect Elementix to your CRM so that every contact you unlock is automatically synced. Once connected, syncing happens in the background with no manual steps required. Supported CRMs are Salesforce, HubSpot, Close, and HighLevel.
Connecting your CRM
-
Go to Settings → Integrations.
-
Choose a provider and click Connect.
Historical backfill (decide before clicking Connect)
By default, every contact your team has previously unlocked is synced to your CRM retroactively. Tick Skip historical backfill before clicking Connect if you'd rather start fresh and only sync contacts unlocked from the moment of connection onward.
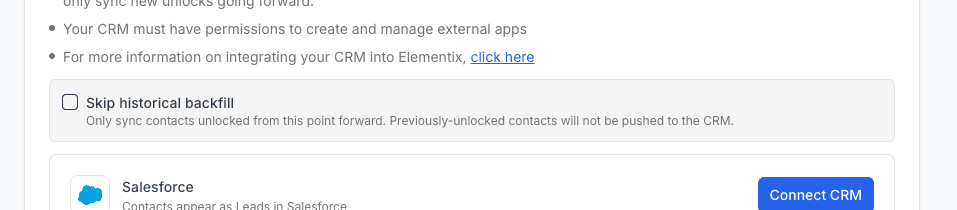
This is a one-time choice made at connect time. To change it later, disconnect and reconnect.
-
A popup opens asking you to log in to your CRM and authorize Elementix. HighLevel additionally asks you to pick which sub-account (location) to connect.
-
After authorizing, you'll see a Connected status with the date of connection.
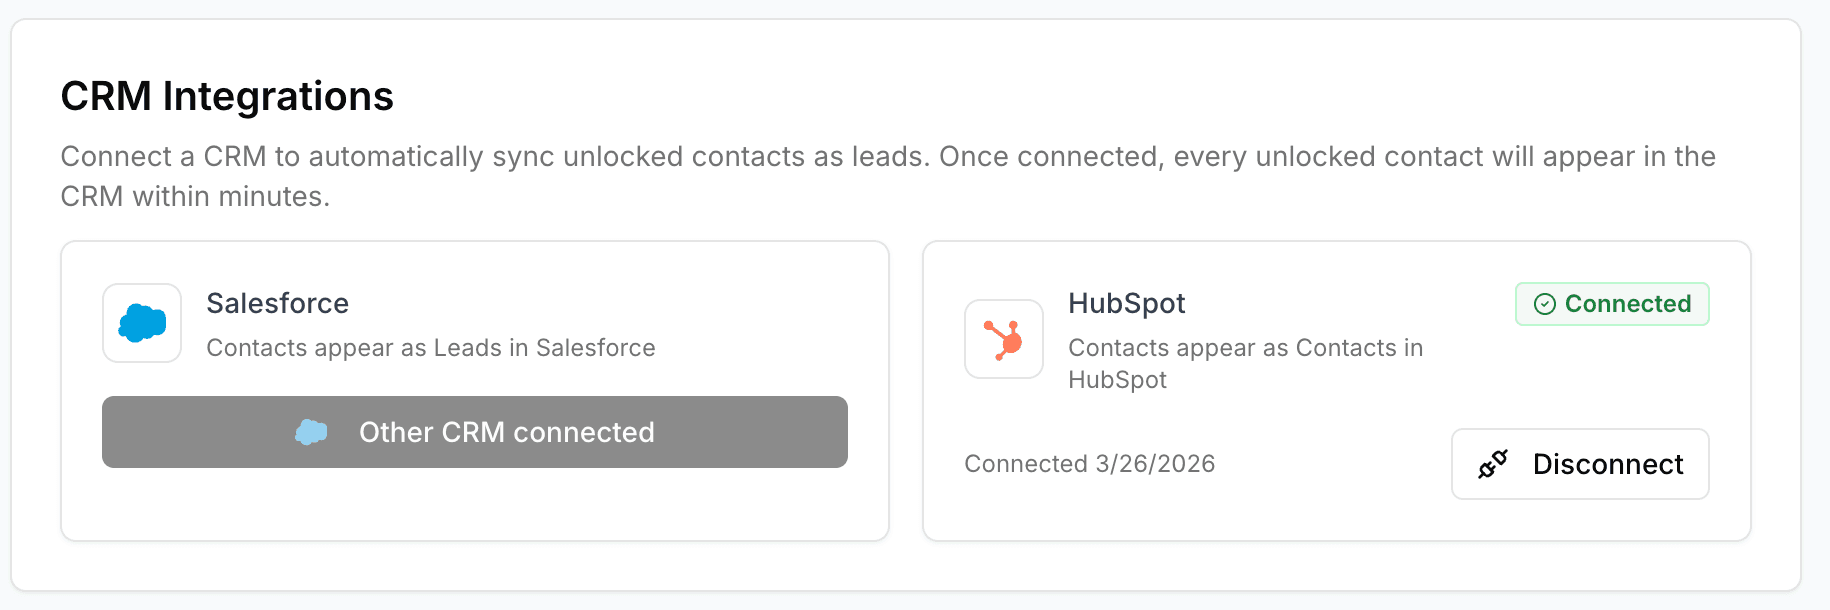
You can only connect one CRM per organization. To switch providers, disconnect the current one first.
How syncing works
Once connected, Elementix automatically syncs unlocked contacts to your CRM in the background — there's nothing you need to do after connecting. New unlocks land in your CRM within a few minutes.
Unless you ticked Skip historical backfill at connect time, contacts your team unlocked before connecting are also synced retroactively. If your backlog is large (thousands of contacts), it may take some time for everything to appear — the backfill runs gradually in the background and won't impact day-to-day sync of new unlocks.
Each synced record includes:
- Name — First and last name
- Email and phone — From the unlocked contact data, when available
- Company and title — Company name and role
- Location — City, state, zip, and country from their most recent mortgage
- LinkedIn URL — If available
- Elementix Profile URL — A deep link back to the person's profile in Elementix
- Owner — The CRM user whose email matches the Elementix user who unlocked the contact
Not every CRM exposes every field natively. Where a CRM doesn't have a matching standard field, Elementix either uses the closest equivalent or adds a custom field on your behalf. Fields a CRM doesn't support at all are simply skipped.
Keeping records up to date
From time to time, Elementix refreshes contact data behind the scenes as part of routine updates to our data. When that happens, the corresponding record in your CRM is updated in place rather than duplicated. How matching works depends on the CRM — see each section below for details.
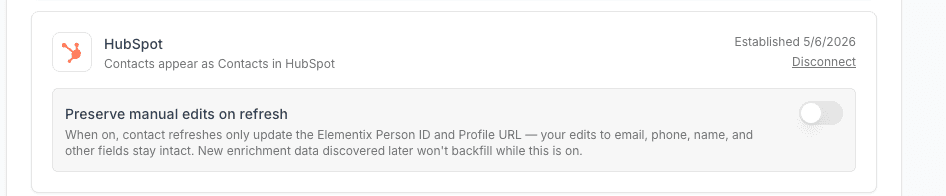
Preserving manual edits
By default, contact refreshes overwrite the record in your CRM with the latest enrichment data. If you or your team regularly edit contact details directly in your CRM (correcting a phone number, fixing a name, etc.), you can opt to keep those edits.
Toggle Preserve manual edits on refresh on the connected CRM card under Settings → Integrations. When enabled:
- The first time a contact is synced, Elementix still writes the full payload (the contact has to be created somehow). This includes setting the owner to whoever unlocked the contact.
- On every subsequent refresh, only the Elementix Person ID and Profile URL are updated. Your edits to email, phone, name, address, and any other fields stay intact.
- Owner reassignments are preserved. If your team reassigns a synced contact in your CRM (e.g. routing to a different rep by territory), refreshes won't restamp the owner back to the original unlocker.
- New enrichment data Elementix discovers later (e.g. a LinkedIn URL surfaced on a follow-up enrichment) won't backfill onto existing contacts while the toggle is on.
This setting is admin-only and applies to all contacts in the connected CRM.
Salesforce
Contacts are synced as Lead objects in Salesforce.
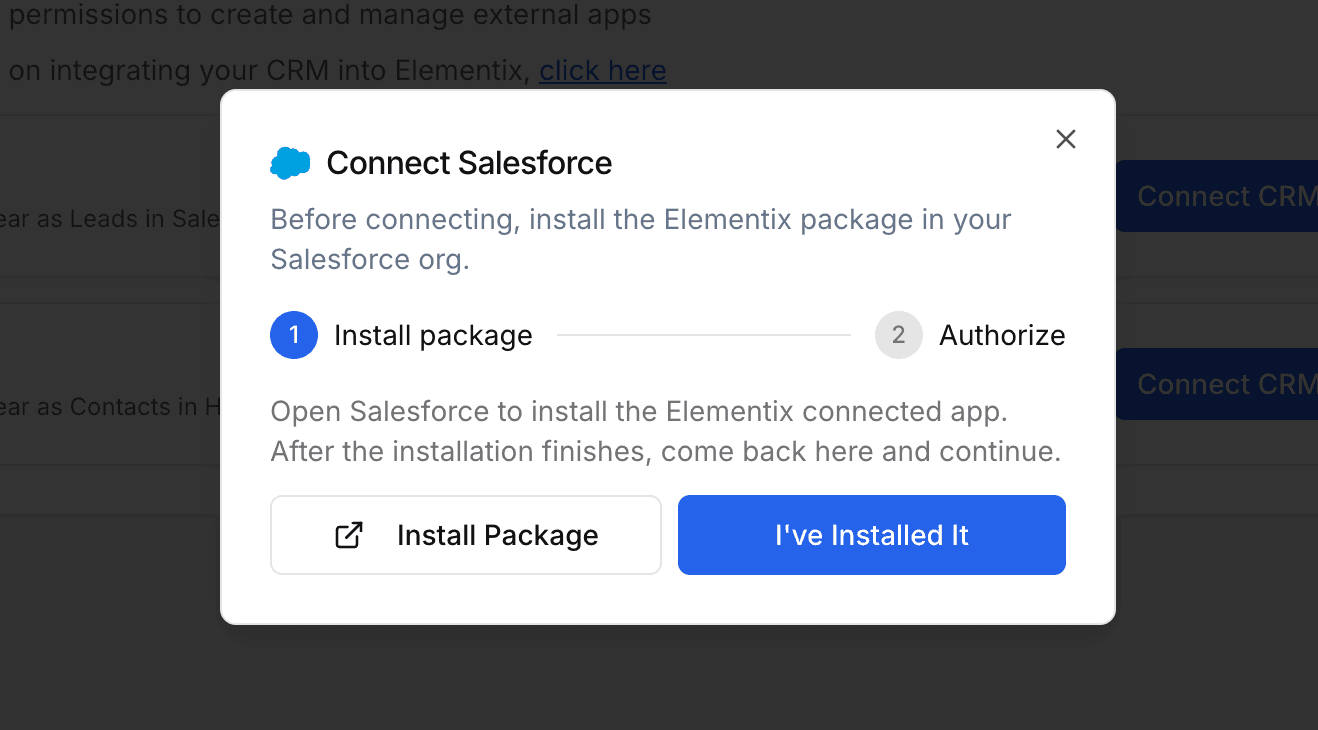
One-time setup: install the Elementix app
Salesforce requires an Elementix-managed app to be installed in your org before you can connect. The app adds two custom fields to the Lead object — an Elementix Person ID and an Elementix Profile URL — that Elementix uses to match and update leads.
When you click Connect Salesforce, Elementix walks you through this in a step-by-step modal:
- Install the Elementix managed app in your Salesforce org via the install link.
- Sign in and authorize Elementix in the standard Salesforce OAuth popup.
How matching works
Salesforce doesn't dedupe leads on its own. Elementix handles it by stamping each Lead with an Elementix Person ID. When a contact's data is later refreshed, Elementix looks up the Lead by that ID and updates it in place. If a Salesforce duplicate rule flags the lead, the sync still succeeds.
Owner assignment
Each Lead's owner is set to the Salesforce user whose email matches the Elementix user who unlocked the contact. If there's no matching Salesforce user, the Lead falls back to your org's default owner.
Permissions required
When you authorize Elementix, Salesforce will ask you to grant the following:
| Permission | Why it's needed |
|---|---|
| Manage user data via APIs | Create and update Lead records, and look up Salesforce users to assign leads to the correct owner. |
| Perform requests at any time | Keep the connection active so syncing continues in the background, even when you're not logged in to Elementix. |
You need permission to install packages and connected apps in Salesforce. If the install or authorization fails, check with your Salesforce admin.
HubSpot
Contacts are synced as Contact objects in HubSpot.
On first connect, Elementix adds two custom properties to the Contact object: Elementix Person ID and Elementix Profile URL. These are populated automatically on every synced contact and let you click through from HubSpot back to the person's profile in Elementix.
How matching works
HubSpot matches contacts by the Elementix Person ID custom property. When a contact's data is later refreshed, Elementix looks up the Contact by that ID and updates it in place — even if the email address has changed since the original sync.
HubSpot enforces email uniqueness on contact creation, separately from the matching logic above. If two different unlocked people happen to share the same work email, the first one syncs normally; the second one will fail to sync because HubSpot blocks duplicate emails. This is rare in practice and not something you can configure away — most people have unique emails.
Owner assignment
Each Contact is assigned to the HubSpot user whose email matches the Elementix user who unlocked it. If there's no match, the Contact is left unassigned and your own HubSpot workflows can route it.
Permissions required
When you authorize Elementix, HubSpot will ask you to grant the following:
| Permission | Why it's needed |
|---|---|
| Read contacts | Look up existing contacts to match and update them in place. |
| Write contacts | Create and update Contact records when you unlock someone. |
| Read contact properties | Verify the Elementix custom properties exist before each sync. |
| Write contact properties | Add the Elementix Person ID and Elementix Profile URL custom properties on first connect. |
| Read owners | Match Elementix users to HubSpot users for owner assignment. |
Your HubSpot account must have permission to install apps. If the authorization fails, check with your HubSpot portal admin.
Close
Each unlocked person is synced as a Lead with a nested Contact — the Lead represents the company, and the Contact represents the person.
- If Elementix knows the person's company, the Lead is named after it. Otherwise the Lead is named after the person.
- All contact details (emails, phones, LinkedIn) live on the Contact.
- On first sync, Elementix adds three custom fields to the Contact object: Elementix Person ID, Elementix Profile URL, and Elementix Owner.
How matching works
Close doesn't enforce uniqueness on its own, so Elementix matches contacts by the Elementix Person ID custom field stored on each Contact. When a contact's data is later refreshed, Elementix looks up the Contact by that ID and updates it in place. The parent Lead is deliberately left alone, so you can freely rename, merge, or reorganize Leads without breaking sync.
Owner assignment
Close doesn't have a native assignment field on contacts, so Elementix uses the Elementix Owner custom user field. It's set to the Close workspace user whose email matches the Elementix user who unlocked the contact.
Permissions required
When you authorize Elementix, Close will ask you to grant the following:
| Permission | Why it's needed |
|---|---|
| Read and write Leads and Contacts | Create new Leads and Contacts, and update existing ones. |
| Read and write custom fields | Create the three Elementix custom fields on first sync and write values to them. |
| Read users | Match Elementix users to Close workspace users for the Elementix Owner field. |
| Offline access | Keep the connection active so syncing continues in the background. |
HighLevel
Contacts are synced as Contact objects in the HighLevel sub-account (location) you select when connecting.
On first sync, Elementix adds three custom fields to the Contact object: Elementix Person ID, Elementix Profile URL, and Elementix LinkedIn URL.
How matching works
HighLevel matches contacts by the Elementix Person ID custom field. When a contact's data is later refreshed, Elementix searches for the contact by that ID and updates it in place.
Recommended: Allow Duplicate Contacts
By default, HighLevel rejects any contact that shares an email or phone number with an existing one. Because Elementix matches contacts by our own person ID rather than by email or phone, two legitimately different people who happen to share a corporate email or phone can trip this check — and HighLevel will block the second one from syncing.
To make sure every unlocked contact lands in HighLevel, go to Settings → Business Profile → Contact Deduplication Preferences and enable Allow Duplicate Contact.
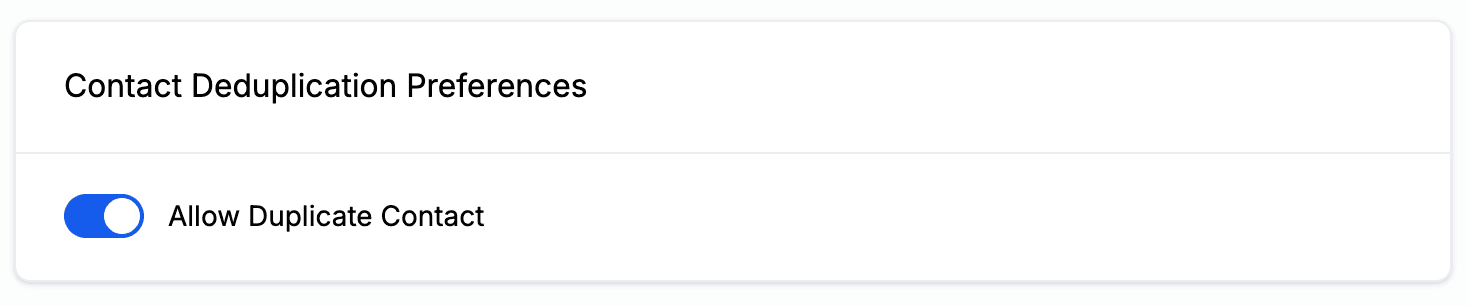
If you don't enable it, syncing still works — you may just see occasional contacts skipped in the rare case where two unlocked people share an email or phone.
Owner assignment
Each Contact is assigned to the HighLevel user whose email matches the Elementix user who unlocked it, using HighLevel's native Assigned To field. If there's no match, the Contact is left unassigned.
Permissions required
When you authorize Elementix, HighLevel will ask you to grant the following:
| Permission | Why it's needed |
|---|---|
| Read and write contacts | Create new Contacts and update existing ones. |
| Read locations | Identify the sub-account (location) being connected. |
| Read and write custom fields | Create the three Elementix custom fields on first sync and write values to them. |
| Read users | Match Elementix users to HighLevel users for ownership assignment. |
Reconnecting
CRM connections occasionally need to be re-authorized — for example if your CRM admin removes Elementix from your CRM's app management, or if Elementix has added new sync features that require additional permissions. When this happens:

- Sync pauses automatically. No unlocks are lost — they're queued for the next successful sync.
- Admins see a Reconnect prompt at the top of every page in Elementix, plus a Reconnect button on the integrations settings page.
- Click Reconnect to re-authorize. The connection is preserved, so all your existing sync state — including which contacts have already been synced — stays intact. Reconnecting takes about 30 seconds and never causes duplicate contacts.
Disconnecting
To disconnect your CRM, go to Settings → Integrations and click Disconnect. This removes the connection and stops future syncing. Contacts already synced to your CRM are not affected.